Capacitance Measurement
The ratio of the quantity of electric charge stored on a conductor to the difference in electric potential is known as capacitance. Self capacitance and mutual capacitance are two closely related concepts in capacitance. Self capacitance is a property of any thing that may be electrically charged. The electric potential difference between the object and the ground is measured in this scenario. At a given potential difference, a material with a large self capacitance maintains more electric charge than one with a low capacitance. Understanding the behavior of the capacitor, one of the three basic linear electronic components, requires an understanding of mutual capacitance (along with resistors and inductors).
Materials for Capacitance Measurement
- • Arduino Uno
- • Cables and Breadboard
- • R1-10KΩ
- • R2-220Ω
- • C1-Any Capacitor for Testing
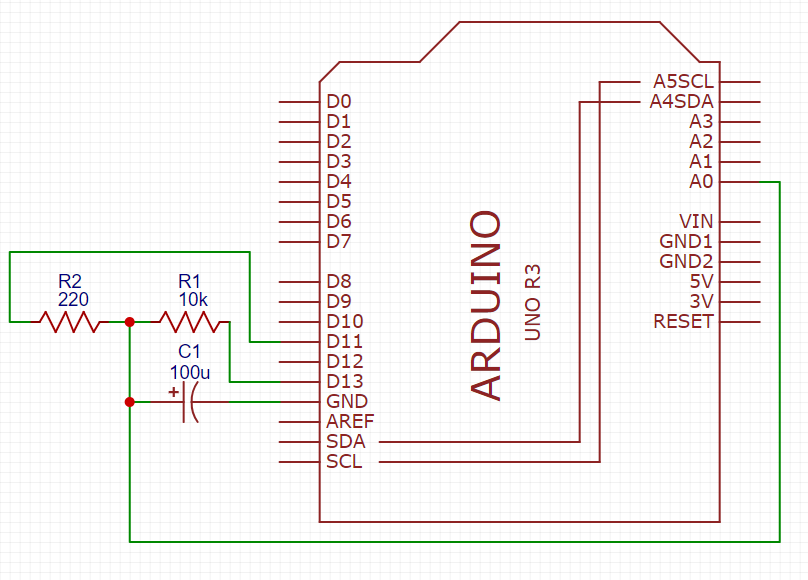
Schematic for Capacitance Measurement
To test this circuit we just need to use any capacitor.

Code for Capacitance Measurement
#define analogPin      0          // analog pin for measuring capacitor voltage
#define chargePin      13         // pin to charge the capacitor - connected to one end of the charging resistor
#define dischargePin   11         // pin to discharge the capacitor
#define resistorValue  10000.0F   // change this to whatever resistor value you are using

unsigned long startTime;
unsigned long elapsedTime;
float microFarads;                // floating point variable to preserve precision, make calculations
float nanoFarads;

void setup(){
  pinMode(chargePin, OUTPUT);     // set chargePin to output
  digitalWrite(chargePin, LOW);
  Serial.begin(9600);             // initialize serial transmission for debugging
}

void loop(){
  digitalWrite(chargePin, HIGH);  // set chargePin HIGH and capacitor charging
  startTime = millis();
  while(analogRead(analogPin) < 648){       // 647 is 63.2% of 1023, which corresponds to full-scale voltage
  }
  elapsedTime= millis() - startTime;
 // convert milliseconds to seconds ( 10^-3 ) and Farads to microFarads ( 10^6 ),  net 10^3 (1000)
  microFarads = ((float)elapsedTime / resistorValue) * 1000;
  Serial.print(elapsedTime);       // print the value to serial port
  Serial.print(" mS    ");         // print units and carriage return
  if (microFarads > 1){
    Serial.print((long)microFarads);       // print the value to serial port
    Serial.println(" microFarads");         // print units and carriage return
  }
  else
  {
    // if value is smaller than one microFarad, convert to nanoFarads (10^-9 Farad).
    // This is  a workaround because Serial.print will not print floats
    nanoFarads = microFarads * 1000.0;      // multiply by 1000 to convert to nanoFarads (10^-9 Farads)
    Serial.print((long)nanoFarads);         // print the value to serial port
    Serial.println(" nanoFarads");          // print units and carriage return
  }
  /* dicharge the capacitor  */
  digitalWrite(chargePin, LOW);             // set charge pin to  LOW
  pinMode(dischargePin, OUTPUT);            // set discharge pin to output
  digitalWrite(dischargePin, LOW);          // set discharge pin LOW
  while(analogRead(analogPin) > 0){         // wait until capacitor is completely discharged
  }
  pinMode(dischargePin, INPUT);            // set discharge pin back to input
}
To see the results you need to check the serial monitor!